So, what's the real story on how long an Instagram Reel can be? Let's cut right to it.
The answer actually depends on how you create your Reel.
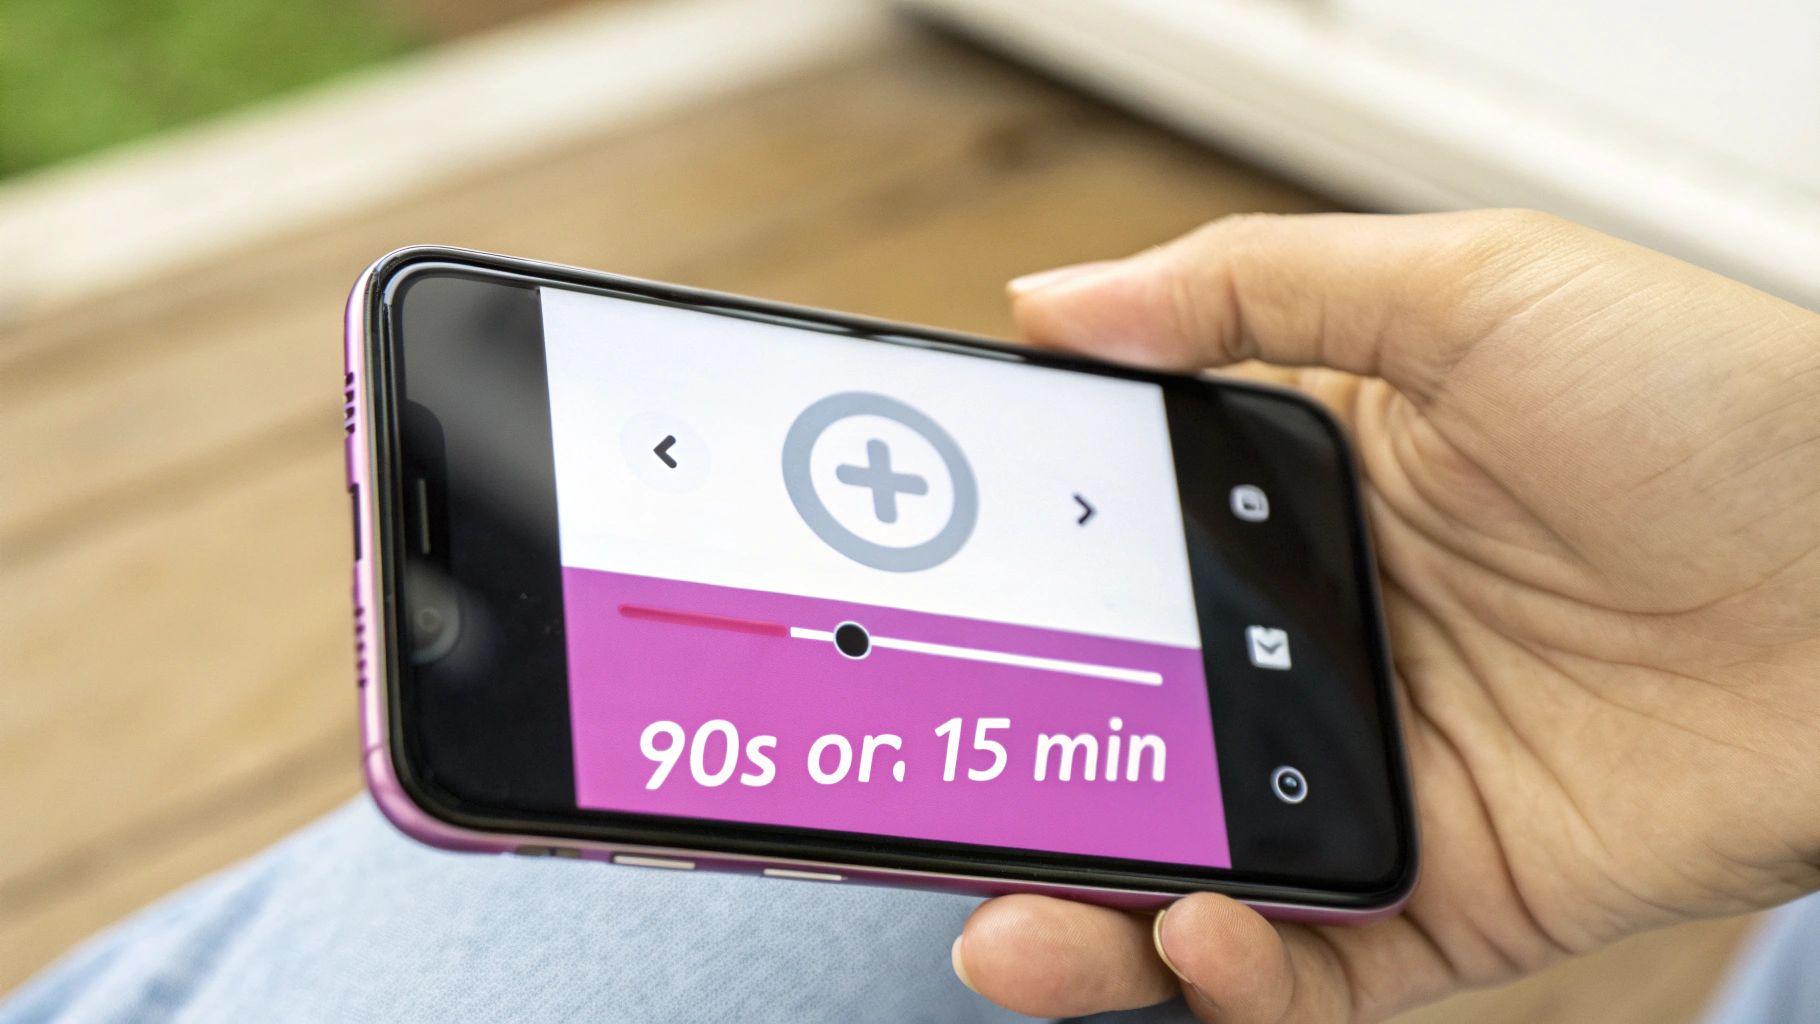
If you're shooting a video directly inside the Instagram app, you have a 90-second time limit. But here’s the game-changer: if you upload a video you’ve already created, Instagram will treat it as a Reel for up to 15 minutes.
This dual-pathway system is crucial. One encourages those quick, snappy clips we all know, while the other gives you the runway for much deeper storytelling. Mastering both is key for any creator or brand looking to really connect with their audience.
In-App Recording vs. Uploaded Videos
Think of the 90-second in-app limit as your tool for creating spontaneous, on-the-fly content. It's perfect for jumping on trends, using Instagram’s own editing features, and grabbing sounds from its audio library.
On the other hand, the 15-minute upload limit is built for more polished, pre-produced videos. This is your go-to for repurposing content from places like YouTube, sharing webinar clips, or posting detailed tutorials. Given that Reels now make up over 20% of the time users spend on Instagram, getting a handle on both short and long formats is a must.
The difference isn't just about the numbers; it's about your strategy. Your goal should dictate the length. A quick behind-the-scenes look might be perfect at 15 seconds, while a product demo could easily use the full 90.
For instance, a chef might post a fast-paced, 20-second Reel of them plating a beautiful dish, set to a trending song. That same chef could later upload a 7-minute video walking through the entire recipe, and Instagram would serve it up as a Reel, too. Both pieces of content hit different needs but live under the same Reel umbrella.
To make it even clearer, here’s a quick summary of the different time limits and how to think about them.
Instagram Reels Length Limits at a Glance
| Creation Method | Maximum Length | Best Use Case |
|---|---|---|
| Recorded In-App | 90 Seconds | Quick trends, tutorials, and spontaneous content. |
| Uploaded Video | 15 Minutes | Repurposed long-form content, detailed storytelling. |
Once you get the hang of these two options, you can start planning your content with much more intention. It stops being about just "making a Reel" and starts being about choosing the right length to make the biggest impact.
The Evolution of Instagram Reels Length
If you want to get a real handle on the current rules for Instagram Reels, it helps to rewind a bit and see how we got here. The changes weren't random; Instagram was reacting to what creators were asking for, what competitors were doing, and how we, the users, were actually watching videos. Every time they bumped up the time limit, it unlocked new creative possibilities.
When Instagram first dropped Reels, it was no secret they were squaring up against the explosive popularity of short-form video. They needed something that captured that same viral, high-energy feel, which meant starting with a tight leash on length to force quick, punchy content.
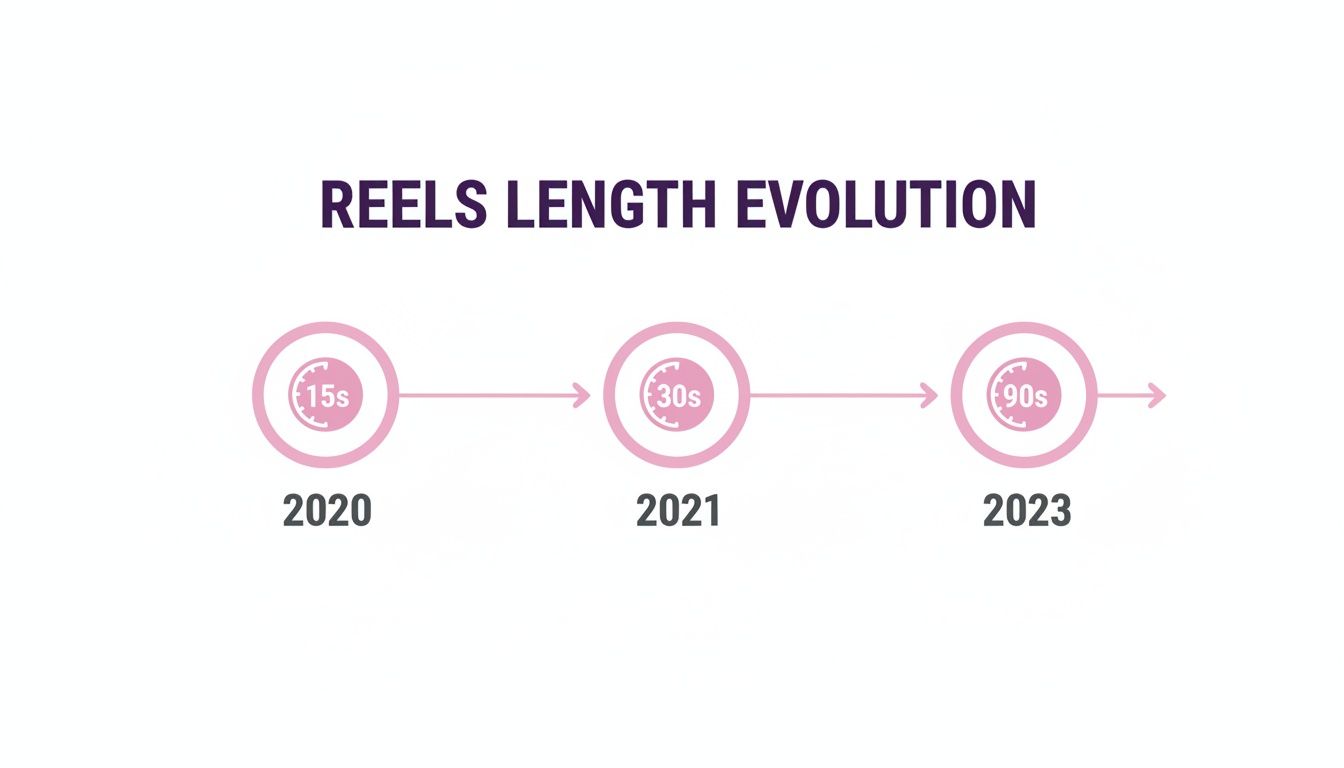
From 15 Seconds to 90 Seconds
That initial time limit was all about "snackable content." Back in August 2020, Instagram Reels launched with a very strict 15-second limit. But it didn't take long for creators to push the boundaries, trying to squeeze mini-tutorials and tiny stories into that window. The demand for more time was immediate and loud. You can see a great breakdown of this timeline over at Social Ralls, but the pace of change was fast.
Thankfully, Instagram was paying attention. The evolution looked something like this:
- The 30-Second Leap: By mid-2021, the limit doubled to 30 seconds. This gave creators just enough breathing room to add a little more substance without killing the quick, snappy vibe.
- Hitting the One-Minute Mark: A year later, they pushed it again to 60 seconds. This was a huge deal. Suddenly, more detailed stories and educational clips were possible, bridging the gap between a quick laugh and a longer-form video.
- The Current 90-Second Standard: Finally, the cap was extended to the 90 seconds we have today. This move cemented Reels as a seriously versatile format, ready for anything from a dance trend to a full product demo.
Why Did the Length Keep Changing?
Every single one of these increases was a calculated move. With short-form video absolutely dominating our screen time—globally, the average user now spends over an hour per day on short-form video apps—Instagram had to keep pace to hold our attention.
Longer videos meant creators could tell better, more complete stories. And better stories keep us watching longer. It was a crucial play to stay competitive, especially as other platforms were already loosening their own time limits.
The jump from 15 to 90 seconds wasn't just a simple feature update; it was a fundamental shift in strategy. It was Instagram's way of saying that Reels wasn't just a fad—it was becoming a core part of the entire platform.
Think about it in practical terms. A fitness influencer in the 15-second days could maybe show you a quick snippet of one exercise. With 90 seconds, that same creator can now walk you through a full three-exercise circuit, explain the proper form for each, and still have time for a call-to-action. The format went from a simple clip to a genuinely useful micro-workout, and that was only possible because the maximum length of Instagram Reels grew up.
Mastering the Technical Specs for Flawless Uploads
Knowing the 90-second time limit for Instagram Reels is only half the battle. To really stand out, your videos need to look sharp and polished. That all comes down to getting the technical specs right.
If you ignore these details, you risk ending up with blurry visuals, awkward cropping, or frustrating upload errors—all of which can kill your video's momentum before it even has a chance.
Think of these specs as the blueprint for a perfect Reel. Just like a builder wouldn't start without precise measurements, you need the right technical foundation to make sure your content looks exactly how you envisioned it. This is your first line of defense against the algorithm (and viewers) flagging your video as low-quality.
Your Essential Technical Checklist
The single most important detail to get right is the aspect ratio. Reels are built for a full-screen, vertical mobile experience, and your video needs to match that.
- Aspect Ratio: Always, always use 9:16. This is the standard vertical format for a phone screen. For example, if you upload a landscape (16:9) YouTube clip without reformatting, it will show up with ugly black bars, which is a dead giveaway that the content was just slapped on the platform without any thought.
- Resolution: Aim for 1080 x 1920 pixels. This is standard HD quality and ensures your video looks crisp and clear on modern smartphones.
- File Format: Stick with MP4 or MOV. These are the most common and reliable formats, so you’re far less likely to run into any upload glitches.
This timeline gives you a quick look at how the in-app recording limits have changed over the years, leading to the 90-second standard we have today.
This jump from 15 to 90 seconds really shows how Instagram is pushing creators to tell more complete stories directly within the Reels format.
Why These Details Matter
Getting these specs right from the very beginning saves you a ton of headaches down the line. A video uploaded in the wrong aspect ratio doesn't just look unprofessional—it can literally cut off important parts of your shot, confusing your audience and weakening your message. If you find yourself struggling to make your content fit, you can find helpful guides on how to convert video aspect ratios for a perfect fit.
Sticking to these technical standards isn't optional if you're serious about growing on Instagram. It signals to both the algorithm and your audience that you create high-quality, native-first content.
At the end of the day, a flawless upload is an invisible one. The viewer should only notice your brilliant content, not the technical package it arrived in. Nail these specifications, and you're already one step closer to creating Reels that stop the scroll.
How to Make Every Second Count in Your Reel
Knowing the maximum length of Instagram Reels is the easy part. The real magic is in making every single one of those seconds work for you. It doesn't matter if your video is 15 or 90 seconds long; its success will always come down to three core elements: a killer hook, a valuable middle, and a clear call-to-action.
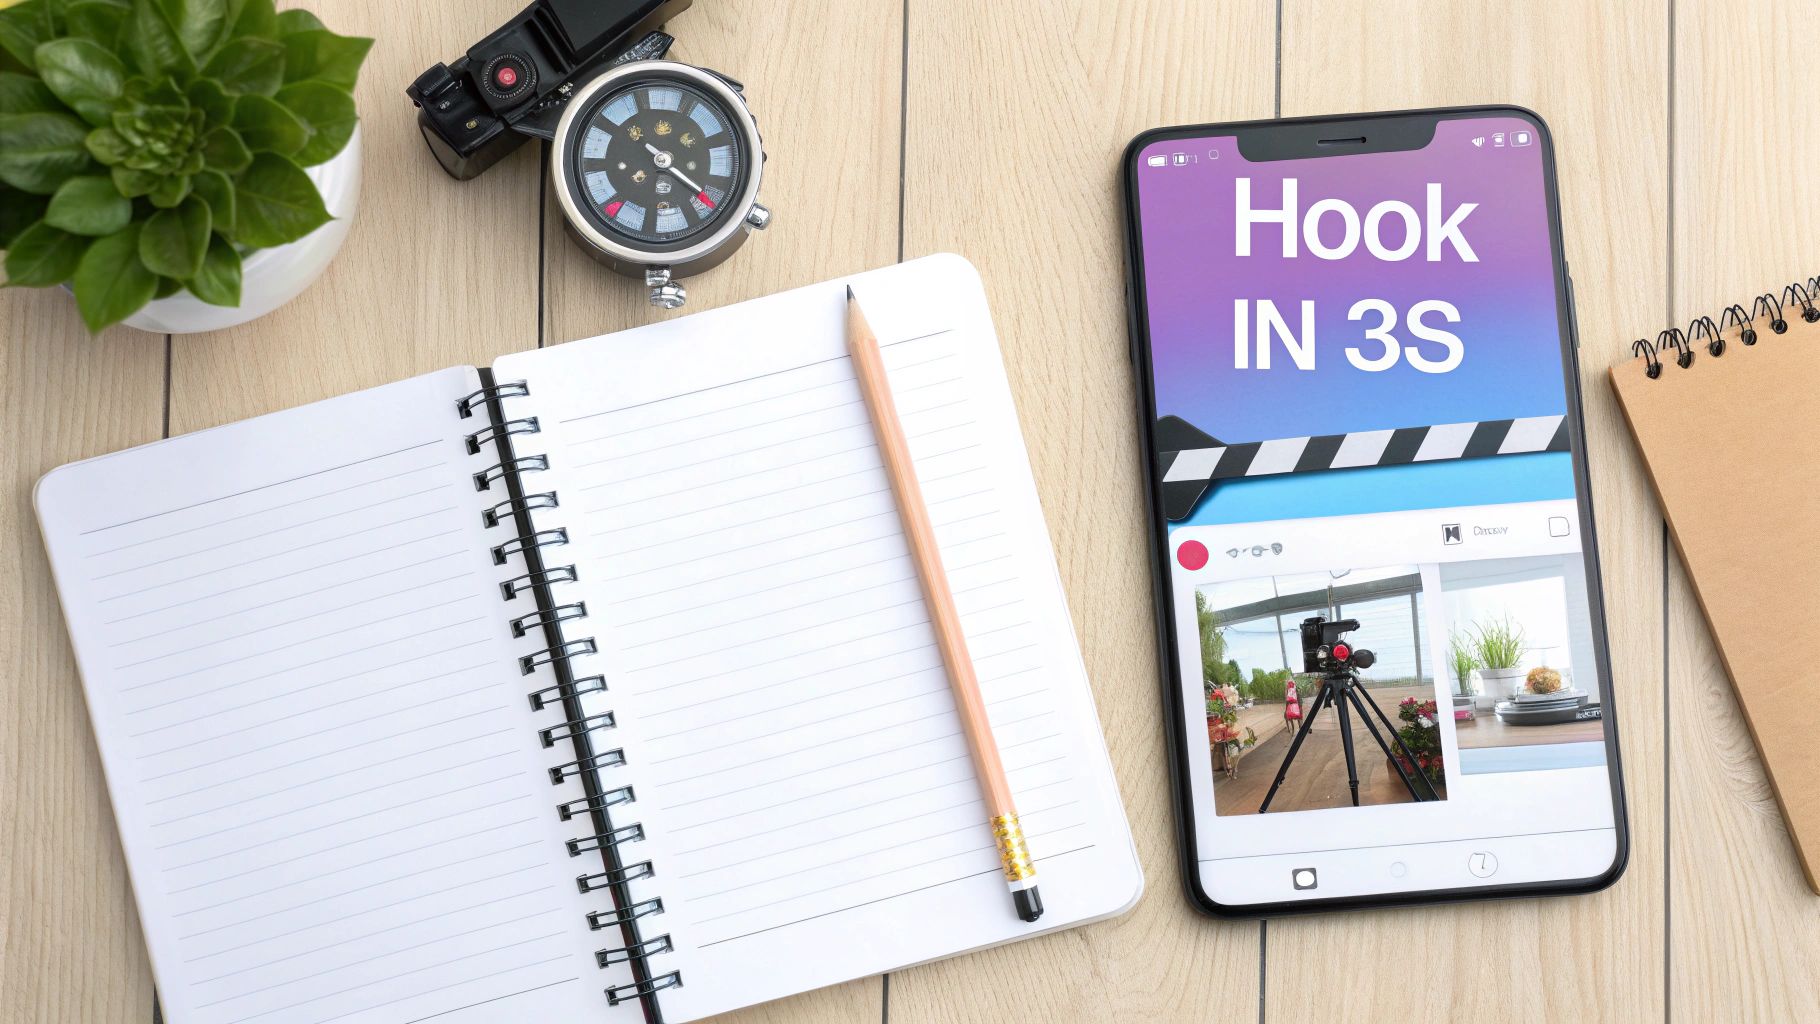
Honestly, the first three seconds are everything. In a world of infinite scrolling, that's all the time you have to convince someone to stop and watch. A strong hook isn't a "nice-to-have"—it's the only thing standing between a view and a swipe. In fact, one study found that nearly a third of viewers will swipe away from a video in the first three seconds if it doesn't grab them.
Your hook has one job: to instantly answer the viewer's silent question, "What's in it for me?"
Crafting the Perfect Hook
To create a hook that actually works, you have to be direct and spark curiosity right away. Forget the slow, branded intro. Jump straight into the action or the most valuable piece of information.
Here are a few hook strategies that work time and time again:
- Ask a pointed question: A personal trainer could start with, "Are you making this huge mistake at the gym?"
- Make a bold claim: A food blogger might use on-screen text that says, "This is the only chocolate chip cookie recipe you'll ever need."
- Start with the end result: A DIY channel could show a stunning "after" shot of a renovated room before even hinting at the "before" or the process.
- Use punchy on-screen text: A headline like "3 Productivity Hacks That Changed My Life" immediately tells people what to expect.
A great hook sets the stage for everything that follows, getting viewers invested enough to stick around for the meat of your content.
Structuring Your Story
Once you've got their attention, the middle of your Reel needs to deliver on that initial promise. This is where you share the tutorial, the tip, or the laugh. The secret here is to keep the energy up with quick cuts, interesting visuals, and maybe some on-screen text to guide the viewer.
Let your content's purpose dictate its length. A quick, funny clip paired with trending audio is perfect in that sweet 7-15 second range. But if you're demonstrating a product or walking through a recipe, feel free to use the full 90 seconds. The goal is simple: use only as much time as you need to tell your story well.
Finally, every single Reel needs a strong call-to-action (CTA). Don't leave your audience hanging! Tell them exactly what you want them to do next. Do you want them to comment, save the Reel for later, or follow you for more? A simple prompt like, "Save this for your next project!" can make a huge difference in your engagement.
A Reel without a CTA is a missed opportunity. You've held a viewer's attention; now, give them a clear next step to deepen their connection with your brand or content.
For instance, here’s how a 60-second Reel script for a sustainable living influencer could break down:
- (0-3 seconds) Hook: On-screen text screams "Stop Throwing Away Your Old T-Shirts!" over a shot of a messy pile of clothes.
- (4-50 seconds) Middle: A flurry of quick clips shows three creative ways to turn old shirts into tote bags, cleaning rags, or dog toys.
- (51-60 seconds) CTA: The final shot displays all three finished projects with the text, "Which idea was your favorite? Tell me in the comments & follow for more DIY tips!"
Turning Long-Form Videos Into Engaging Reels
You're likely sitting on a goldmine of potential Reels and don't even know it. Your podcasts, webinars, interviews, and other long-form videos are packed with powerful moments just waiting to be shared. Repurposing these assets isn't just about saving time; it's a smart strategy for turning one polished video into a whole series of engaging, bite-sized clips.
The whole idea is to find the most impactful snippets from your existing content and give them a new life as standalone Reels. Think about it: instead of letting valuable insights fade away after a single broadcast, you can get so much more mileage out of everything you create. This approach helps you reach new audiences without constantly being on the hamster wheel of filming from scratch.
A Step-by-Step Workflow for Repurposing
Turning a long video into a handful of effective Reels is actually pretty straightforward once you get the hang of it. You just need to put on your editor's hat and start hunting for those "aha!" moments that deliver maximum value in a short amount of time. To really get this right, you can dive into some powerful content repurposing strategies that show you how to breathe new life into your content library.
Here’s a simple workflow you can follow:
- Identify Key Moments: First, watch your original video and pinpoint the most compelling parts. You're looking for strong quotes, surprising stats, actionable tips, or emotional story beats that can stand on their own.
- Extract and Isolate Clips: Cut those key moments out. Aim for segments that are between 15 and 90 seconds long, making sure each clip contains one complete thought or idea.
- Optimize for a Vertical Format: This is a big one. You have to reframe each clip for a 9:16 aspect ratio. This makes the video feel native to the Reels feed and not like a lazy copy-paste job.
- Add Engaging Elements: Now, bring it to life. Add dynamic captions, on-screen text overlays, and maybe some relevant background music to grab and hold attention. If you need a hand with the technical side, check out our guide on how to cut videos into parts for the best results.
- Write a Compelling Caption and CTA: Finally, craft a caption that adds a bit of context and includes a clear call-to-action (CTA). Tell people what you want them to do next—comment, share, or follow you for more.
Practical Example From a Webinar
Let's make this real. Imagine you just hosted a 30-minute webinar on digital marketing trends. Instead of just letting the recording collect dust on your website, you can slice it up into a week's worth of Reels.
While watching it back, you might spot a few perfect moments:
- A 45-second clip where you explain a common SEO mistake.
- A 60-second segment detailing a surprising social media statistic.
- A 30-second soundbite where you give three quick tips for email marketing.
- A 90-second case study walking through a successful client campaign.
By breaking down your long-form content, you're not just reusing it; you're making it more accessible. You meet your audience where they are—on mobile, scrolling for quick, valuable insights—and deliver your expertise in a format they actually prefer.
Just like that, one 30-minute webinar has given you four distinct, high-value Reels ready to be scheduled. This approach doesn't just fill your content calendar; it consistently reinforces your authority on the subject by dripping out helpful information. It’s simply a smarter, more efficient way to make your content work harder for you.
Best Practices for Boosting Engagement and Reach
You've created the perfect Reel, and it's timed just right. Now, it's time for the final, crucial step: packaging it for maximum impact. Think of this as your pre-flight checklist—the small details that tell the Instagram algorithm your content is worth showing to more people.
First up, and arguably one of the most powerful tools in your kit, is trending audio. Hopping on a sound that's blowing up can get your Reel in front of a massive new audience. The algorithm actively promotes content using popular audio, and you'll often see a huge difference in reach compared to Reels with only original sound.
Optimize for Discoverability
Next, you need to make it easy for people to find your Reel. This is where your hashtags and caption come into play. A smart hashtag strategy isn't just an afterthought; it's a core part of getting discovered.
- Relevant Hashtags: Don't just throw random tags on your post. Use a mix of broad and niche hashtags. If you're a baker sharing a video, for example, you might use a broad tag like #baking along with a super-specific one like #sourdoughtips to attract both a general crowd and serious enthusiasts.
- Conversational Captions: Your caption is your chance to start a conversation. Ask a question, share a quick story behind the video, or prompt your followers for their opinions. This kind of interaction is gold for the algorithm.
Maximizing your reach isn't just about what you post, but when you post it. Publishing your Reel when your audience is most active is a critical piece of the engagement puzzle.
To really nail this, you'll want to find the best time to post Instagram Reels for peak engagement. By combining a great hook, valuable content, and these strategic optimizations, you're giving every single Reel its best shot at success.
A Few Lingering Questions
Let's clear up some of the most common questions that pop up when creators and marketers start getting serious about Instagram Reels. Here are the quick, straight-to-the-point answers you need.
So, Can I Actually Post a Reel Longer Than 90 Seconds?
Yes, you can—with one important catch. You can upload pre-recorded videos from your camera roll that are up to 15 minutes long, and Instagram will automatically share them as a Reel.
The 90-second time limit only kicks in when you're recording a Reel directly inside the Instagram app. It's a key difference to remember when you're planning out your content.
What’s the Perfect Length for a Reel?
There’s no one-size-fits-all answer here. The best length truly depends on what you're trying to accomplish with your video.
Think of it this way:
- 7–15 seconds: This is the sweet spot for grabbing attention fast. It’s perfect for viral trends, quick jokes, or anything with a punchy hook that makes people want to watch it again. Data shows this range often has the highest completion rate.
- 60–90 seconds: Need more time? This range is great for mini-tutorials, behind-the-scenes vlogs, or any story that delivers real value. The goal here is to earn saves, not just views.
While stats often show shorter Reels get watched all the way through more often, the only way to know for sure is to experiment. Check your Instagram Insights to see what resonates with your audience.
Does Making a Longer Reel Hurt the Video Quality?
Not directly. The length itself isn't the problem; it's the file size and the compression that follows. Longer videos mean bigger files, and Instagram has to compress every video to make sure it loads smoothly for everyone on the platform.
To give your video the best fighting chance against compression, always export your final cut at 1080p resolution in an MP4 format. This is the best way to preserve as much quality as possible, whether your Reel is 10 seconds or 10 minutes long.